
Blog
Fusion 360 STL Workflow: Export, Import and Mesh-to-Solid

Fusion 360 Export STL: 3 Methods for Perfect 3D Prints
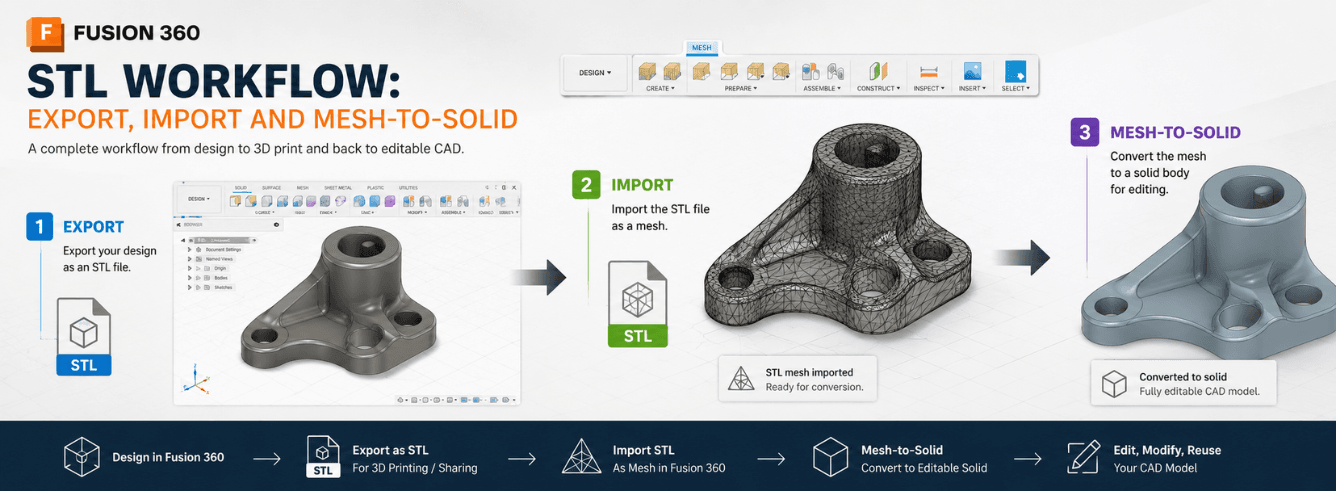
Fusion 360 export STL workflows are the bridge between your CAD designs and your 3D printer. With three native methods available—Save As Mesh, 3D Print, and File > Export—choosing the right one makes the difference between a perfect print and a failed job. This guide shows you exactly how each method works, when to use it, and how to avoid common pitfalls.
- Fusion 360 export STL offers three official routes: Save As Mesh (fastest), 3D Print (most control), and File > Export (cloud processing for complex files).
- Mesh refinement matters: Curved surfaces need higher resolution; balance quality against file size for slicer compatibility.
- For assemblies: export the entire model as one STL or individual bodies—your choice depends on whether you’re printing single or multi-colour.
- Mesh-to-solid conversion is possible via the Mesh tab: use Convert Mesh with face groups for complex scans.
- When you need to fusion 360 export STL for commercial work, ensure you’re using a licensed copy—Zoftis offers genuine Autodesk Fusion 360 subscriptions starting at $59/year.
Three ways to fusion 360 export STL
Autodesk Fusion 360 gives you three native methods to fusion 360 export STL files, each serving a slightly different purpose. Knowing the difference helps you avoid failed exports and wasted time.
The three methods to fusion 360 export STL are:
- Save As Mesh — right-click a body or component in the browser tree and choose this option. Fastest method, works well for individual parts.
- 3D Print command — found in the Tools tab > Make menu. Offers mesh refinement controls and direct integration with slicers like Cura and Bambu Studio.
- File > Export — cloud-based export that handles complex assemblies and configured files. The STL option appears in the file type dropdown.
If you’re working with assemblies, you can fusion 360 export STL for the entire model as a single file or each body separately—multi-colour printing setups often require the latter.
Important: All three methods work in Fusion 360’s free personal use license as well as paid subscriptions. You don’t need a commercial license just to fusion 360 export STL.
Method comparison: which route should you choose?
Here’s how the three methods stack up against each other when you fusion 360 export STL in real-world use.
| Feature | Save As Mesh | 3D Print command | File > Export |
|---|---|---|---|
| Speed | Fastest — right-click and go | Moderate — opens dialog with options | Slowest — cloud processing |
| Mesh refinement control | Basic | Advanced — high quality for curved surfaces | Basic |
| Slicer integration | No | Yes — sends directly to Cura, PreForm, Bambu Studio | No |
| Works with assemblies | Yes — right-click top-level component | Yes — select multiple bodies | Yes — best for configured files |
| File format options | STL, 3MF | STL, 3MF, OBJ | STL, plus many other CAD formats |
When you need to fusion 360 export STL for a simple part, Save As Mesh is your quickest option. For complex geometries with curves, the 3D Print command gives you better mesh control. And when Save As Mesh fails, File > Export is your reliable backup.
Pro tip: If you’re exporting complex curved surfaces, use the 3D Print command and set the mesh refinement to High. This increases triangle count but preserves detail when you fusion 360 export STL.
Save As Mesh: the quick right-click method
Save As Mesh is the fastest way to fusion 360 export STL when you need a quick file for a single body or component.
How to use Save As Mesh
- In the browser tree (left panel), right-click on the body, component, or component group you want to export.
- Select Save As Mesh from the context menu.
- Choose your format — STL (binary or ASCII) or 3MF.
- Click OK and save the file to your computer.
Exporting multiple components
If you need to fusion 360 export STL for multiple specific components, you have a couple of options:
- Select multiple bodies: In the browser tree, Ctrl+click (Windows) or Cmd+click (Mac) to select the components you want, then right-click and choose Save As Mesh.
- Export the entire assembly: Right-click the top-level component in the browser tree and choose Save As Mesh — this saves everything in one STL file.
- Export individual components: If you need separate files for multi-colour printing, right-click each component and save individually.
When you fusion 360 export STL using Save As Mesh, the file saves locally—no cloud processing, no waiting.
Warning: Save As Mesh may not work for some object types or complex assemblies. If the option is greyed out when you fusion 360 export STL, use File > Export instead.
3D Print command: the slicer-friendly route
The 3D Print command is arguably the most powerful native method to fusion 360 export STL. It gives you mesh refinement controls and can send your model directly to a slicer application.
How to use the 3D Print command
- Switch to the Tools tab in the toolbar.
- Click 3D Print from the Make menu.
- Select the bodies you want to export.
- Deselect the “Send to 3D Print Utility” option if you just want to fusion 360 export STL without opening a slicer.
- Adjust mesh refinement settings — higher quality for curved surfaces, lower for faster slicing.
- Click OK and save your STL.
Critical: If the OK button becomes unselectable after deselecting “Send to 3D Print Utility” when you fusion 360 export STL, simply click the mouse button next to “Selection” in the dialog and reselect your geometry. The OK button will reappear.
Direct slicer integration
Keep the “Send to 3D Print Utility” option selected to send your STL directly to slicers like:
- Bambu Studio
- UltiMaker Cura
- PreForm
- Creality Print
- Chitubox Pro (via add-ins)
This streamlines your workflow by automatically opening the slicer with the prepared file after you fusion 360 export STL.
File > Export: cloud conversion for complex files
If the other two methods fail or you’re working with configured files, File > Export is your fallback when you fusion 360 export STL. This method processes the file through Autodesk’s cloud translation service.
How to use File > Export
For files without configurations:
- Click File in the top menu.
- Select Export.
- Choose STL as the file type from the dropdown.
- Click Export — the file goes through cloud translation before downloading.
For configured files:
- Click File > Export.
- In the first tab, switch to Active Configuration.
- Select STL as the file type.
- Click Export.
When you fusion 360 export STL via File > Export, you also get access to other formats like .F3D, .IGES, .SAT, .STEP, and .SMT for collaboration.
Note: File > Export is the most reliable method to fusion 360 export STL when dealing with complex assemblies or files with configurations. It’s slower but more robust.
The right export method saves time. The right import method saves your design.
Importing STL files into Fusion 360
To work with an STL file in Fusion 360, you need to import it as a mesh body. There are three ways to do this, each with its own advantages.
Method 1: Insert Mesh (recommended)
This gives you the most control over scaling and positioning:
- Navigate to the Mesh tab in the toolbar.
- On the Create panel, click Insert Mesh.
- Select your STL file and click Open.
- Set the unit type — millimetres, centimetres, inches, etc. STL files are unitless, so this step matters.
- Reposition the mesh if needed by flipping axes or centering it on the origin.
- Click OK.
Method 2: Open or Upload
For quick import without the Insert Mesh dialog:
- File > Open — opens the STL as a new Fusion design file in direct modelling mode.
- Data panel > Upload — uploads STL, OBJ, or 3MF files to your Fusion project.
Watch your units: When you open an STL via File > Open, one unit from the original file is interpreted as one centimetre — even if you designed in millimetres. Always check scaling.
Mesh to solid conversion: turning scans into editable bodies
Once you’ve imported an STL, you may want to convert it to a solid body for parametric editing. Fusion 360’s mesh-to-solid tools can handle this, but there are important details to know.
How to convert mesh to solid
- Go to the Mesh tab in the toolbar.
- Click Modify and select Convert Mesh.
- Select the mesh body you want to convert.
- Choose between Parametric and Base Feature options:
- Parametric: Creates individual faces for each mesh face — produces a cleaner look but can be heavy on resources.
- Base Feature: Creates a copy of your mesh body — useful if you want to preserve the original.
- Click OK.
Face groups and mesh complexity
Fusion 360 works best when converting meshes with fewer than 10,000 faces. If your STL is too complex, you may need to:
- Reduce the number of facets using the Modify menu tools before conversion.
- Generate face groups from the Prepare menu to help Fusion recognise geometric features.
- If you get a “Cannot convert mesh body to solid” error, applying face groups before conversion often resolves it.
Pro tip: If your converted mesh turns into a surface body instead of a solid, look for open surfaces. You can patch them and stitch the patch to create a solid body.
Organic vs prismatic conversion: Fusion 360 offers an Organic conversion option that takes a tri-mesh to quad-mesh to T-spline to B-rep. The base feature option stops at the T-spline stage, letting you edit the mesh further before converting.
Troubleshooting common STL export issues
Even experienced users hit snags when they fusion 360 export STL. Here’s how to handle the most common problems.
Export fails or gets stuck halfway
If your file gets halfway through exporting before failing, or shows “Translation failed”:
- Switch to the 3D Print command — this often bypasses the issue when you fusion 360 export STL.
- If using File > Export, try the 3D Print method instead.
STL option missing from export dropdown
If STL doesn’t appear in the File > Export dropdown:
- Use the 3D Print command as an alternative — it supports STL export natively.
- Check that you’re in the Design workspace — STL export is not available in all workspaces when you fusion 360 export STL.
OK button greyed out in 3D Print dialog
This happens when you deselect “Send to 3D Print Utility”:
- Reselect your geometry — click next to “Selection” in the dialog and choose your bodies again.
- The OK button will reappear so you can fusion 360 export STL.
Mesh conversion fails — “Cannot convert mesh body”
If the Convert Mesh command fails:
- Generate face groups first — use Prepare > Generate Face Groups before converting.
- Reduce mesh complexity — use Modify > Reduce Mesh to get under 10,000 faces.
- Make sure Capture Design History is enabled in the browser.
Mesh converts to surface, not solid
Sometimes the conversion process creates a surface body instead of a solid:
- This usually means one or more mesh triangles caused an error during conversion.
- Find the open surface and use Patch to close it, then Stitch to create a solid body.
Remember: When you fusion 360 export STL, the STL format is unitless. Always check your scaling before slicing—millimetres vs inches is a common mistake.
Ready to get serious with Fusion 360?
Get a genuine Autodesk Fusion 360 for Windows subscription — $59 (reg $99). Email delivery within 1–12 hours, backed by a 30-day money-back guarantee.
Get Fusion 360 Now →CAD, CAM, CAE and PCB all in one subscription. Activated on your own Autodesk account.
Frequently asked questions
What’s the fastest way to fusion 360 export STL?
The fastest method to fusion 360 export STL is Save As Mesh — right-click a body or component in the browser tree and select it. No dialogs, no cloud processing, just a quick file save.
Can I export multiple bodies as separate STL files?
Yes, you can right-click multiple selected components and choose Save As Mesh, or use the 3D Print command to select multiple bodies. For multi-colour printing, saving each body separately is often required when you fusion 360 export STL.
How do I convert an STL to a solid body in Fusion 360?
Go to the Mesh tab, click Modify > Convert Mesh, select your mesh, choose Parametric or Base Feature, and click OK. If the mesh has more than 10,000 faces, consider reducing it first before you fusion 360 export STL.
Why won’t my STL export from Fusion 360?
Common causes include file complexity, errors in the model, or using the wrong export method. Try switching to the 3D Print command or using File > Export if Save As Mesh fails. If the OK button is greyed out in 3D Print, reselect your geometry to fusion 360 export STL.
What’s the difference between STL binary and ASCII?
Binary STL files are smaller and more common for 3D printing. ASCII STL files are larger but human-readable. Most slicers accept both formats. Use binary for faster uploads and smaller file sizes when you fusion 360 export STL.
Can I fusion 360 export STL for free?
Yes — all three export methods (Save As Mesh, 3D Print, File > Export) are included in Fusion 360’s free personal use license, as well as paid subscriptions. You don’t need a commercial license just to fusion 360 export STL.
What’s the best file format for 3D printing from Fusion 360?
STL is the most widely supported format for 3D printing. When you fusion 360 export STL, choose binary format for smaller file sizes. For multi-colour printing, consider 3MF as an alternative.
How do I fix a non-watertight STL from Fusion 360?
Most slicers can repair minor holes automatically. For major issues, use Fusion 360’s mesh repair tools before you fusion 360 export STL, or use dedicated software like Netfabb or Meshmixer for more complex repairs.