
Blog
How to Create a Viewport in AutoCAD (Layout & Model Space)

How to Create a Viewport in AutoCAD: 4 Methods for Perfect Layouts Every Time
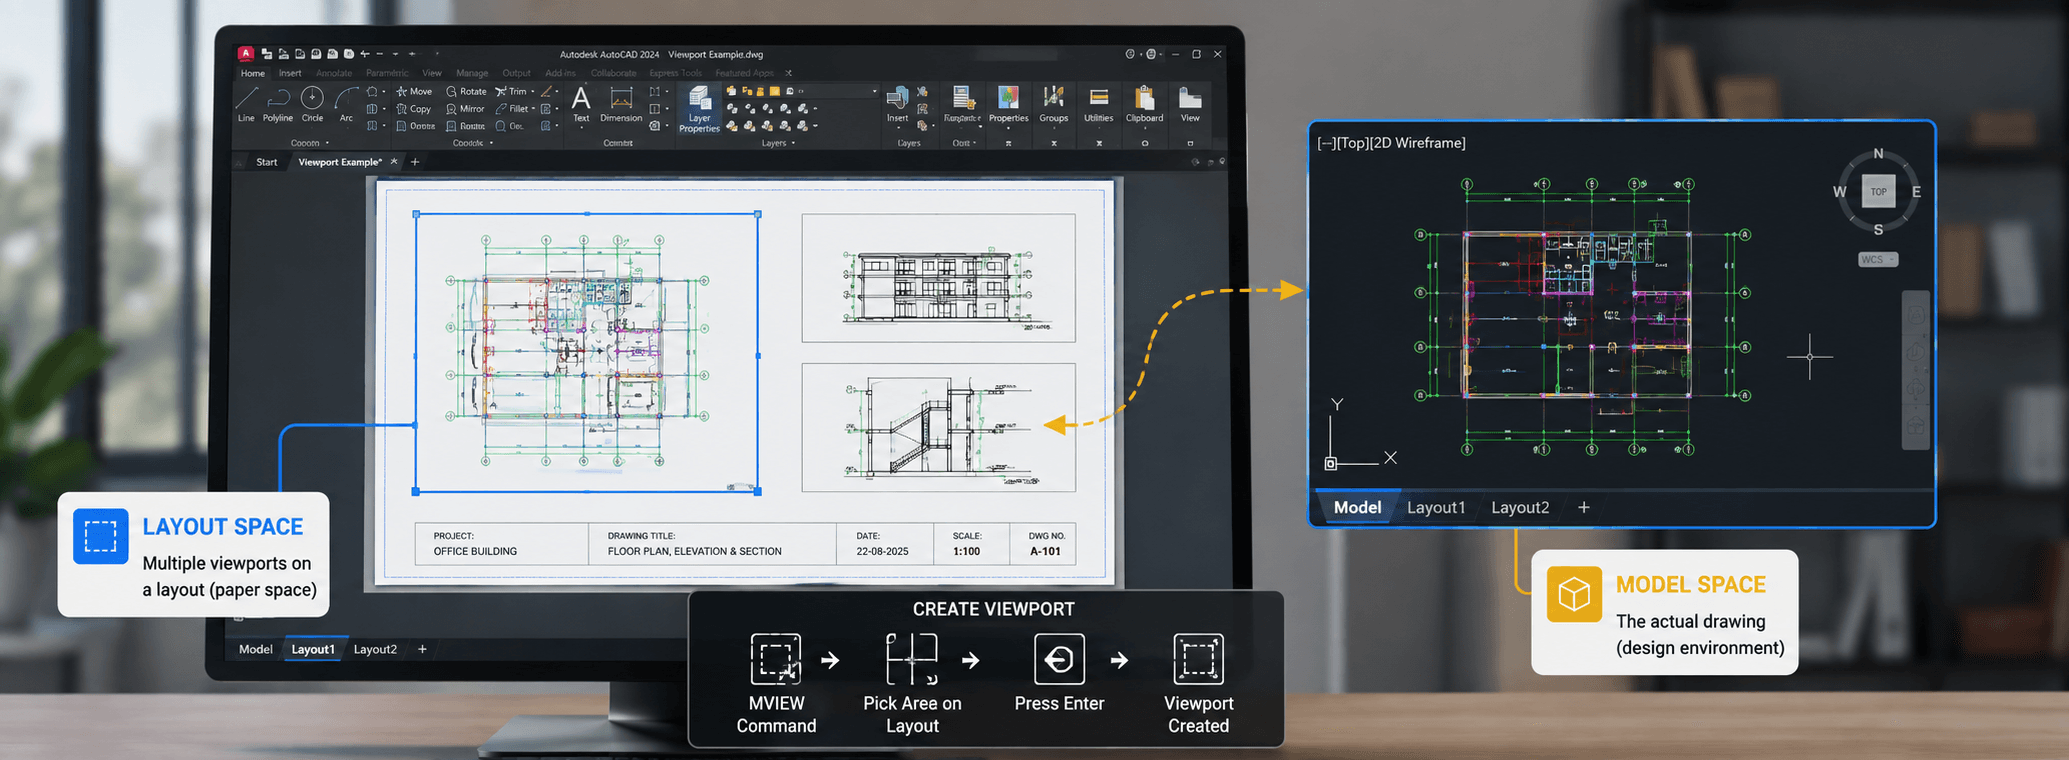
Learning how to create a viewport in AutoCAD is one of the most important skills for turning your 3D models or 2D drawings into professional, printable sheets. The key difference is understanding where you are—model space for drawing, and paper space for plotting.
- Two Worlds: Model space is your infinite 1:1 drawing board. Paper space is your “sheet of paper” for layout and plotting.
- Four Ways to Create: Use the MVIEW or VPORTS command for rectangular, polygonal, or object-based viewports. You can also use named views to generate precise viewports with one click.
- The Golden Rule: Once your viewport is scaled, lock it. This prevents accidental zooming or panning and is the number one rule to follow.
- Pro Control: Use per-viewport layer freezing to control exactly what is visible in each viewport on your sheet.
Model Space vs. Paper Space: Why You Need Both
The first thing to understand is that there’s a big difference between model space and paper space. If you’ve ever opened a drawing and seen a strange dashed rectangle around a plan—and your commands didn’t work the same way—you’ve seen the difference in action.
| Feature | Model Space | Paper Space |
|---|---|---|
| What it is | The limitless drawing environment (1:1 scale) | The “sheet of paper” for layouts |
| Primary use | Creating 2D/3D geometry, drafting | Arranging views, adding title blocks, plotting |
| Scale | 1:1 (real-world units) | Scaled based on paper size and viewport magnification |
| Viewport type | Tiled viewports (VPORTS command) | Floating viewports (MVIEW command) [citation:1] |
| Multiple views | Can split the drawing area into tiled viewports [citation:6] | Can create unlimited, overlapping, floating viewports |
Why Paper Space Layouts Are Essential for Professionals
- You can create multiple views of your 3D model (top, front, isometric) on the same sheet.
- You can scale each viewport independently to create detail views and enlarged plans.
- You can freeze different layers in different viewports for clean, readable sheets .
- You can plot directly from paper space with title blocks, notes, and labels.
Pro Tip: Using a template with pre-configured layout tabs can save you hours of setup. Start from a template and get your AutoCAD license today to jumpstart your workflows.
Preparing Your Drawing for Viewport Creation
Before you create a viewport in AutoCAD, it’s critical to make sure your model space drawing is clean and complete. The viewport is literally a “window” to your model space—so prepare the view, not the window.
- Clean up your drawing: Purge unused layers, blocks, and styles. Any visible entities will appear in your viewport.
- Set up your units: Use UNITS command to define drawing units (millimeters, inches, etc.). Viewport scales work best with consistent units.
- Create named views: Save specific views using the VIEW command. This lets you automatically create a viewport with the correct view and initial scale.
- Plan your sheet: Know your final paper size (A4, A3, ANSI D, etc.). Your paper space sheet size must match or be scaled to your intended output.
4 Methods to Create a Viewport in AutoCAD
There are several ways to create a viewport in AutoCAD, from simple rectangles to advanced named-view workflows. Here are the four most effective methods, each suited to a different scenario.
Method 1: The MVIEW Command (The Classic Way)
The MVIEW command is the standard way to create layout viewports. It’s simple, fast, and offers multiple options. Use the command line version MVIEW or the -VPORTS command for full control.
- Switch to your layout tab at the bottom of the screen.
- Type MVIEW and press Enter.
- Specify the first corner of your rectangular viewport.
- Specify the opposite corner. A rectangular viewport appears.
- Double-click inside it to enter model space and adjust your view.
Method 2: Using Named Views (The Smartest Way)
This is the most efficient method if you use named views. It’s a major time-saver.
- Go to the layout tab. The Layout contextual ribbon appears.
- In the Layout Viewports panel, find and click the largest icon—the one that looks like a viewport with a drop-down arrow [citation:1].
- A dropdown will appear listing all your saved named views from model space.
- Select the named view you want to display. AutoCAD creates a viewport sized exactly to that view, and automatically applies the correct scale [citation:1].
This is the “coolest” feature that most beginners overlook [citation:1]. If you don’t have a named view, the tool even lets you define one on the fly.
Method 3: Polygonal or Irregular Viewports
You’re not limited to rectangles. To create a viewport in a non-rectangular shape [citation:1]:
- Type MVIEW and press Enter.
- Enter P for Polygonal.
- Pick points to define the irregular boundary.
- Press Enter to complete the polygon. A viewport with that shape is created.
Method 4: Convert an Object to a Viewport
You can turn any closed 2D object (circle, ellipse, closed polyline, or spline) into a viewport.
- Draw a circle, ellipse, or closed polyline in paper space.
- Type MVIEW and press Enter.
- Enter O for Object [citation:1].
- Select the closed object. It instantly becomes your viewport.
Scaling Your Viewport: A Step-by-Step Guide
Once you’ve learned how to create a viewport, the next step is to scale it properly. Scaling is what makes paper space powerful. Here are the steps to get it right.
| Step | Action | Result |
|---|---|---|
| 1 | Double-click inside the viewport to activate it (the border gets thicker). | You’re in model space via the viewport. |
| 2 | From the status bar, select a standard scale from the drop-down, or use the Properties palette. | The view scales to match the drawing. |
| 3 | Enter ZOOM > 1/50XP for 1:50 scale, or use ZOOM > 1/100XP for 1:100. | You can create a custom scale via the command line. |
| 4 | To create a custom scale not in the list, go to the Scale List (status bar), choose Custom, and add your scale. | Custom scales appear in the drop-down for easy future use. |
Pro Tip: The annotation scale controls the size of annotative objects (text, dimensions) in a viewport [citation:3]. If text doesn’t plot at the correct size, make sure the annotation scale matches the viewport scale.
The #1 Rule: Lock Your Viewport
This is not optional—it’s the most important rule in paper space. Once the view is properly set and scaled, lock the viewport [citation:1].
“Once the view is properly set up… LOCK THE VIEWPORT.” — Autodesk Blog [citation:1]
- Why lock? Locking prevents accidental zooming or panning from within the viewport. This is the number one cause of plots being wrong or sheets looking inconsistent.
- How to lock: Select the viewport border, right-click, choose Display Locked > Yes [citation:14]. Alternatively, use the Properties palette (Ctrl+1) and set Display Locked to Yes.
- To unlock: Select the viewport border, right-click, choose Display Locked > No [citation:14].
Critical Warning: If you lock a viewport and then try to zoom, nothing will happen. This is a good thing! It means your scale is locked. Don’t panic—unlock it if you need to change the view.
How to Rotate a Viewport in AutoCAD
Sometimes you need to rotate the view inside a viewport to better fit a sheet or align with a title block. Here is how to make it happen.
- Using the DVIEW Command: This is the most common method.
- Double-click inside the viewport to activate it.
- Type DVIEW and press Enter.
- Enter TW for Twist.
- Specify a rotation angle (e.g., 30 degrees). The view rotates inside the viewport.
- Alternative: Use the VPOINT command to change the 3D viewing angle, though this is more common for 3D views.
- Important: The viewport itself is not rotated; the view inside the viewport is rotated. This preserves the viewport’s scale and geometry while adjusting the angle.
Mastering Per-Viewport Layer Management
This is one of the most powerful features in paper space: layer settings specific to a viewport. You can freeze a layer in one viewport while keeping it thawed in another [citation:1].
- How to do it: Activate the viewport (double-click inside it). Open the Layer Properties Manager. In the column labeled VP Freeze (or Viewport Freeze), click the icon to freeze that layer in the current viewport only.
- New VP Freeze: If you want a layer to be automatically frozen in all future viewports, set the New VP Freeze option .
- Why this matters: Imagine a floor plan on a sheet. In your main viewport, you show all layers. In your detail viewport (a bathroom), you freeze the structural layers and show only plumbing and fixtures. The result is a clean, readable sheet.
Remember: The VPLAYER command and the VP Frz settings only work in layout viewports (paper space), not in tiled model space viewports .
5 Pro Tips for Viewport Efficiency
To truly master how to create a viewport in AutoCAD and speed up your workflow, use these pro-level tips.
- Tip 1: Use the VPMAX Command — Activate a viewport and use VPMAX to temporarily maximize it to the full screen. Work on your view, then use VPMIN to return to the layout.
- Tip 2: Clip a Viewport — If you have a rectangular viewport and want an irregular shape, use the VPCLIP command. Select the viewport and a polyline (or existing object) to clip it to a new boundary.
- Tip 3: Control Viewport Borders — Place viewport borders on a dedicated, non-plotting layer (like a layer named “VPORTS”) and set it to not plot. Never use the Defpoints layer for this [citation:1].
- Tip 4: Use Quick Properties — When a viewport is selected, press Ctrl+Shift+P to open the Quick Properties palette. Here you can quickly change scale, lock status, and other settings.
- Tip 5: Annotation Scale and Viewport Scale — When you change the viewport scale, the annotation scale updates to match [citation:3]. This ensures annotative objects (like text and dimensions) are always the correct plotted size.
Frequently Asked Questions
What is the difference between model space viewports and layout viewports?
Model space viewports split the drawing area in the model tab. Layout viewports are objects in paper space that show views of model space. Layout viewports can overlap, have irregular shapes, and are used for plotting. Model space viewports (VPORTS command) are only for display in model space and are not used for plotting [citation:6].
How do I create a viewport in AutoCAD from an existing object?
Use the MVIEW command, then enter O for Object. Select a closed object like a circle, ellipse, or polyline, and it becomes a viewport [citation:1].
Why is my viewport not showing my drawing?
Try these solutions:
- Make sure the viewport is not on a frozen or off layer.
- Check that the layer of the objects in model space is thawed and on.
- Double-check that you are in the correct viewport and that the model space is not zoomed to an empty area.
How do I unlock a viewport in AutoCAD?
Select the viewport border, right-click, and choose Display Locked > No [citation:14]. You can also use the Properties palette (Ctrl+1) and set Display Locked to No [citation:5].
Can I create an irregular shaped viewport in AutoCAD?
Yes. Use the MVIEW command and enter P for Polygonal. Then pick points to define the shape. You can also convert a closed polyline, ellipse, or circle into a viewport using the Object option [citation:1].
Ready to Master AutoCAD? Get Your Genuine License Today.
Stop using trial versions or outdated software. With a genuine Autodesk AutoCAD license from Zoftis, you get full access to viewports, paper space, and all professional drafting tools. From $59/year, delivered to your email in 1–12 hours. Backed by our 30-day money-back guarantee.
Check AutoCAD Price →Also available: AutoCAD for Mac and the AutoCAD Commercial License.