
Blog
Basic AutoCAD Commands Every Beginner Should Memorize

Basic AutoCAD Commands That Build Real Speed — Not Just a Cheat Sheet
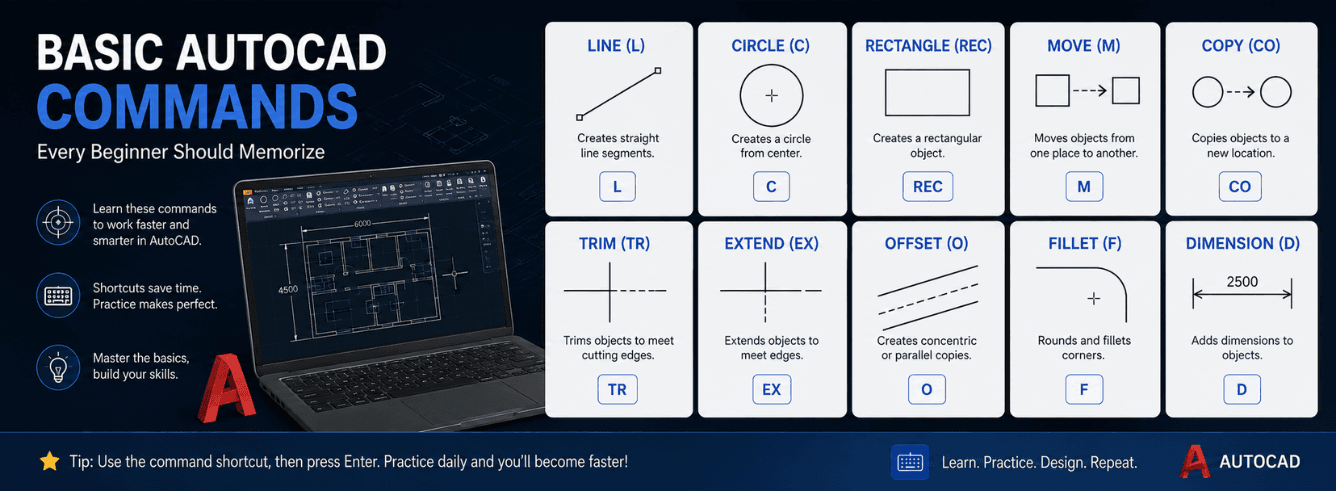
Memorising a handful of basic AutoCAD commands changes everything about how you draft — because every second you spend hunting through ribbon tabs is a second someone faster is finishing the drawing and moving on to the next job.
- The command line is not a beginner crutch — it’s the speed interface professional drafters rely on.
- Only 15–20 basic AutoCAD commands cover roughly 80% of everyday 2D drafting work.
- Customising your command aliases (the PGP file) turns two-keystroke shortcuts into an actual speed advantage.
- Dynamic Input keeps your eyes on the drawing area — toggling it off at the wrong moment slows you down more than you’d think.
- A licensed copy of AutoCAD on your own machine means your custom aliases and workspace follow you across projects.
Why command-line thinking still beats clicking
Walk behind any drafter billing by the hour and you’ll notice the same thing: their left hand never leaves the keyboard. The right hand moves between the mouse and the keyboard only for numeric input. That rhythm — type a command alias, hit Enter or Space, execute, repeat — is what separates a relaxed drafter from someone fighting the interface all day.
The ribbon is fine for discovering tools you use twice a month. But for the basic AutoCAD commands you fire dozens of times per session — LINE, TRIM, OFFSET, MIRROR, MOVE, COPY — reaching for a toolbar icon every time is like typing with one finger. You can do it. It just costs you.
The command line doesn’t care what order you learned things in. You can type MIRROR before OFFSET or OFFSET before TRIM — unlike the ribbon, which forces you through its own logic. The command line follows yours.
A beginner who learns keyboard commands in week one will outpace someone who clicked icons for six months. That’s not a guess — it’s visible in any office where junior and mid-level drafters share a project folder. The juniors who memorise basic AutoCAD commands early stop asking where tools live and start asking where the project is going.
What makes a command “basic” for a beginner
Not every command deserves equal brain space on day one. A basic AutoCAD command is one you need in nearly every drawing session regardless of discipline — architecture, mechanical, civil, or electrical. If you can go a full week without touching it, it’s not basic. If you reached for it three times in the last hour, it belongs in your fingers.
- The command works in plain 2D without any vertical or discipline-specific add-on.
- You use it during both layout and detailing stages.
- There is a shorter alias already assigned, or you can assign one yourself.
- Knowing it reduces backtracking — fewer undo stacks, fewer exploded blocks to clean up.
The draw-and-modify trio that handles most flatwork
If I could only teach someone three drawing commands and three modify commands on their first morning in AutoCAD, here is exactly what I’d pick — and why this set keeps you productive while you learn the rest.
LINE, PLINE, and CIRCLE (the draw set)
LINE is your obvious starting point. Type L, Space, pick a start point, pick an end point. But the trick beginners miss is that LINE keeps running — click another point, and another, and it chains segments until you hit Enter or Escape. That’s faster than launching LINE fresh for every wall or boundary segment.
PLINE (polyline) is what you graduate to the moment someone tells you those separate LINE segments won’t offset as one unit. A polyline is a single object made of connected straight or arc segments. When you need to offset a room perimeter, hatch an enclosed area, or calculate an area with one click, you want a closed polyline — not eight individual lines. The alias PL gets you there.
CIRCLE (C) looks trivial until you realise how many ways AutoCAD lets you define one: centre-radius, centre-diameter, 2-point, 3-point, tan-tan-radius, tan-tan-tan. For a beginner, centre-radius covers most ground. Memorise the 2-point method early if you’re doing mechanical work — it’s the fastest way to drop a circle between two bolt-hole centres.
After drawing a series of connected LINE segments, type PEDIT, select any segment, and answer “Yes” when AutoCAD asks if you want to turn it into a polyline. Then JOIN the rest. Ten seconds instead of redrawing.
TRIM, OFFSET, and MIRROR (the modify set)
TRIM (TR) cuts objects back to a cutting edge. The workflow beginners discover too late: hit TR, Space twice (which selects all objects as cutting edges), then click every segment you want to remove. Two Spaces then click-click-click. That’s the real speed version — not picking cutting edges one by one.
OFFSET (O) creates a parallel copy at a specified distance. Wall thicknesses, road centrelines, PCB traces — all offset workflows. Type O, enter your distance (or pick two points to define it on-screen), select the source object, and click the side you want the offset to appear on. The command stays active, so you can offset the same distance repeatedly without re-entering the value.
MIRROR (MI) is the productivity command beginners don’t use enough. Any symmetrical part of a drawing — and most architectural plans, mechanical brackets, and circuit layouts have symmetry — should only be drawn once. Draw half, MIRROR across a centreline, and move on. The prompt asks if you want to erase source objects: almost always answer No unless you’re flipping something.
If you walk into your second week knowing LINE, PLINE, CIRCLE, TRIM, OFFSET, and MIRROR cold, you’re already faster than most users who’ve been clicking icons for a year.
The positioning commands that stop you from redrawing everything
Drawing geometry once is easy. Moving it, copying it, and rotating it without starting over — that’s where beginners waste hours. Three positioning commands sit at the core of efficient drafting, and they all work the same way: select objects, pick a base point, pick a destination.
MOVE, COPY, and ROTATE
MOVE (M) relocates selected objects. The base-point concept confuses beginners at first — you pick a reference point on the object (a corner, a centre, an intersection) and then pick where that point should land. That precision beats dragging things by eye every time.
COPY (CO) works identically to MOVE but leaves the original in place. The hidden productivity feature: COPY stays active for multiple placements. Pick a base point, click destination one, click destination two, click destination three — all in one command launch. That’s how you populate bolt circles, column grids, or furniture layouts without re-launching anything.
ROTATE (RO) spins objects around a base point. The Reference sub-option is the power move here: when you don’t know the rotation angle but you can point to where something should align, type R during the ROTATE command, pick a reference line on your object, then pick where it should point. No angle calculation needed.
The STRETCH command beginners overlook entirely
STRETCH (S) is the one command that saves more redrawing time than any other — and half the beginners I meet have never used it. Unlike MOVE, which shifts whole objects, STRETCH pulls a selection window across part of your drawing and only moves the vertices caught inside. The critical rule: you must select with a crossing window (right-to-left, green) or crossing polygon, never a standard window (left-to-right, blue). Use it to lengthen a room, reposition a door along a wall, or extend a shaft without re-drawing or trimming anything.
If STRETCH moves objects you didn’t intend to touch, you selected with a regular window instead of a crossing window. Drag right-to-left (green selection) and only the vertices inside the crossing boundary will move.
Display and selection commands nobody teaches on day one
Most beginner AutoCAD tutorials start with drawing and modify commands. They skip the viewport controls — which is why new drafters spend half their time zooming in and out with a scroll wheel, losing their place, and zooming again. Two display commands and one selection shortcut fix this.
ZOOM Window and ZOOM Previous
ZOOM Window (Z then W, or just Z and pick two corners) lets you frame exactly the area you want to work on. It’s more precise than scrolling in and out because you define the view boundary. After you finish that detail, type Z then P (Previous) to snap back to your last view. Zoom Previous is the fastest undo for your screen — it doesn’t touch your drawing, only your view. Pro drafters bounce between Z-W (zoom in on a detail) and Z-P (pop back out) dozens of times per session.
REGEN and why your arcs look like stop signs
When circles and arcs start looking faceted, you need REGEN (RE). It regenerates the entire drawing display at the current resolution. AutoCAD simplifies curved geometry on screen to maintain performance; REGEN recalculates the smooth display. You’ll also run REGEN after changing system variables like LTSCALE or FILLMODE when linetypes or hatches look wrong.
Select Similar — the right-click weapon
Right-click on any object, choose “Select Similar” from the context menu, and AutoCAD selects every object in the drawing with matching properties — same layer, same object type, same colour. From there, you can change properties across all of them at once via the Properties palette. A beginner who learns Select Similar in month one saves more time than someone who learns ten obscure commands in month six.
Object snaps are not optional — they’re the accuracy layer
Drawing without object snaps is like measuring with a rubber ruler. You might land near the right point, but you won’t land on it. OSNAP settings determine whether your lines actually touch, your circles are concentric, and your dimensions report true values.
The snaps you need running, and the ones you override
Toggle running object snaps with F3 or type OSNAP to open the settings dialogue. The four snaps worth running constantly for 2D work are ENDpoint, MIDpoint, CENtre, and INTersection. PERPendicular and QUAdrant are useful but situational — many drafters leave them off and invoke them manually with a Shift+right-click override when needed.
NEARest is the snap you should almost never leave running. It snaps to any point along an object — not a geometrically meaningful point, just the closest spot. Running NEARest gives you the illusion of accuracy without any actual precision. Lines that look connected but report a 0.003mm gap? That’s NEARest running in the background.
The Shift+right-click shortcut menu gives you a one-time override snap. Use it when you need a snap type that isn’t in your running set — for example, snapping to a TANgent on a circle during a LINE command. The override applies once then reverts to your running snaps.
Making the alias file work for you, not Autodesk’s defaults
Every one of those two-letter shortcuts — L for LINE, TR for TRIM, O for OFFSET — lives in a plain-text file called acad.pgp. Autodesk ships sensible defaults, but sensible defaults aren’t your defaults. The commands you use most should live under the fastest keystrokes your left hand can reach without looking.
Finding and editing the PGP file
Inside AutoCAD, the fastest route is the Ribbon: Manage tab → Customization panel → Edit Aliases (which opens the PGP in Notepad). You can also reach it manually — on a Windows system with AutoCAD 2026, the PGP typically sits under C:\Users\[yourname]\AppData\Roaming\Autodesk\AutoCAD 2026\R26.1\enu\Support\acad.pgp. After saving changes, type REINIT and tick “PGP File” to reload without restarting AutoCAD.
Alias changes that pay off immediately
- Change COPY from
COtoC— CIRCLE moves toCI(you draw circles far less than you copy objects). - Add
XXfor EXPLODE andXXLfor XLINE — the double-tap pattern is fast for commands you fire repeatedly. - Map
1,2,3to your three most-used layer states or LISP routines if your workflow is repetitive. - Remove aliases you never touch — they’re mental clutter, and the PGP loads faster without dead entries.
Your PGP file is one of the few things worth backing up. If you rebuild your workstation or switch to a new machine, dropping your custom acad.pgp into the support folder restores years of muscle memory instantly. If you’re practising basic AutoCAD commands on a licensed copy tied to your own Autodesk account, that customisation travels with you.
Dynamic Input: when to use it and when to kill it
Dynamic Input (toggle with F12) shows command prompts, dimension fields, and pointer input right beside your crosshair instead of down in the command line. For beginners, it keeps your eyes on the drawing. For experienced users, it’s a personal preference that some swear by and others disable permanently.
The real argument for Dynamic Input as a beginner: when you’re drawing a LINE and typing a distance, the input field follows your cursor. You see the angle and distance updating live. That visual feedback reduces the mental load while you’re still building spatial awareness of how AutoCAD interprets your input. The argument against it: on a complex drawing, the floating tooltip can obscure the geometry you’re trying to snap to, and two users out of three will eventually toggle it off during detailed work.
Leave Dynamic Input on while learning basic AutoCAD commands. Turn it off temporarily when snapping in tight geometry where the tooltip blocks your view. F12 toggles it mid-command without cancelling anything.
Keyboard versus ribbon: where the time actually goes
The argument isn’t theoretical. Every command launch carries a small cognitive and motor cost, and those costs compound over an eight-hour drafting day. Here is how the two approaches stack up for someone who’s memorised their basic AutoCAD commands versus someone who hasn’t.
| What you’re doing | Keyboard (aliases memorised) | Ribbon (clicking icons) |
|---|---|---|
| Launch LINE, pick two points, finish | ~1.2 seconds (L + Space + 2 clicks) | ~4.5 seconds (move mouse to Home tab → locate icon → click → return to drawing area → 2 clicks) |
| TRIM five overlapping segments | ~3 seconds (TR + Space×2 + 5 clicks) | ~9 seconds (navigate to Modify panel → click Trim → pick cutting edges → 5 clicks) |
| OFFSET a polyline by 150mm | ~2.5 seconds (O + Space + type 150 + pick source + pick side) | ~6 seconds (find OFFSET icon → click → type distance → pick source → pick side) |
| MIRROR a detail across a centreline | ~3 seconds (MI + Space + select objects + pick two mirror points) | ~7 seconds (locate MIRROR in Modify panel → click → select → pick points) |
| Total time for these four operations | ~9.7 seconds | ~26.5 seconds |
| Repeat × 200 instances in a workday | ~32 minutes | ~88 minutes |
The gap isn’t marginal — it’s nearly an hour of lost time per day on just four command types. Scale that across every command you use, every working day, and the keyboard-first drafter finishes projects noticeably earlier or takes on more billable work in the same window.
Nobody ever got faster at AutoCAD by finding a better ribbon icon. Speed comes from your left hand knowing where the keys are before your brain finishes forming the command.
Frequently asked questions
How many basic AutoCAD commands should a beginner memorise first?
Start with about 15. A tight core of draw commands (LINE, PLINE, CIRCLE, RECTANG, ARC), modify commands (TRIM, OFFSET, MIRROR, MOVE, COPY, ROTATE, ERASE), display tools (ZOOM, PAN, REGEN), and one measurement tool (DIST or MEASUREGEOM). Add STRETCH, SCALE, and EXPLODE in week two. That small set handles the majority of 2D drafting tasks, and you’ll add more organically as specific projects demand them.
What is the fastest way to learn AutoCAD keyboard commands?
Print a short list of the 15 core aliases and tape it to the bottom edge of your monitor. For the first week, force yourself to type every command rather than clicking — even if it feels slower at first. By day five, your left hand will reach for L, TR, O, and M without conscious thought. After week two, edit the PGP file so your most-used commands sit under the easiest keystrokes. Practice on a licensed copy where you can save workspace customisations permanently.
Should I use the command line or Dynamic Input as a beginner?
Use both. Leave Dynamic Input on (F12) so dimension fields appear at your cursor — this keeps your eyes on the drawing area while you learn. Keep the command line visible (Ctrl+9 if hidden) as a backup, because it shows the full prompt history including options you might miss in the floating tooltip. Over time, you’ll develop a preference; many experienced drafters run Dynamic Input for drawing commands and toggle it off during heavy snap-dependent editing.
Can I customise AutoCAD shortcut commands without breaking the defaults?
Yes — the acad.pgp file is plain text, and changes only affect your Windows user profile. If you make a mess, delete your custom PGP and AutoCAD falls back to the factory version on next launch. Always keep a backup copy of a working PGP before making bulk edits. Autodesk also provides the “Edit Aliases” button in the Manage tab specifically for safe user-level customisation of autocad shortcut commands.
Why do some common AutoCAD commands stop working mid-session?
Three usual culprits: (1) you accidentally toggled a system variable — F8 (Ortho) and F10 (Polar Tracking) are common accidental presses that change how commands behave; (2) an active command was not fully cancelled — hit Escape twice to clear any hanging command; (3) the PGP file wasn’t reloaded after editing — type REINIT and check the PGP box. If a specific alias stops working, check that another loaded application hasn’t redefined it.
Is it worth buying an AutoCAD licence just to practice basic commands?
If you’re learning for career reasons, practising on a free trial gets you through the first 30 days, but after that you need a licensed copy to continue building muscle memory on your own machine. Zoftis offers genuine Autodesk AutoCAD subscriptions starting from $59 for a 1-year term — that’s a full working copy you activate on your own Autodesk account, with your own workspace, aliases, and templates persisting across sessions. A shared or cracked copy won’t let you save customisations reliably, which defeats half the point of learning keyboard commands properly.
Build your command speed on a genuine AutoCAD licence
AutoCAD 2024–2026 for Windows, $59 for a 1-year subscription (regularly $99). Delivered by email in 1–12 hours, activated on your own Autodesk account, with a 30-day money-back guarantee. Your workspace, your aliases, your speed.
Get AutoCAD for $59 →One-time payment — no auto-renewal surprises.